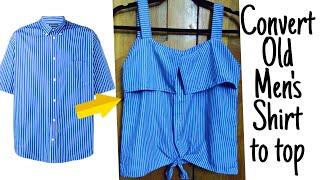
DIY men's shirt into off-shoulder top (easy sewing project for beginners)
Description
Hello, hello and welcome or welcome back my channel. In today's DIY, I am going to show you how I turned a men's shirt into an off-shoulder top.
This is an easy sewing project ideal for beginners, all you need is a men's shirt, some elastic and a sewing machine.
So go steal a shirt from any men in your life and let's get started.
Practical information:
The shirt was size L
You need one wide elastic for the top.
Addition small elastic for sleeves and bottom.
I sew everything using a straight stitch.
This project took me 2 hours, with filming so it will probably take you way less time.
Instructions:
MAKING THE SHIRT OFF-SHOULDER
The first thing I did was making the shirt off-shoulder. I did this by adding an elastic.
Draw a line just above the second button, and cutting this line out.
Next, we are going to make a tube to slide the elastic through.
Fold over an edge from around 5 cm, I use my iron instead of pinning as pins often damage my fabric.
Be sure to iron it good enough, so it stays put while you sew.
Then I introduce the fabric to my sewing machine.
Normally I would leave an opening but I am going to use this button to function as an opening.
Now, I am going to put the elastic inside the tube.
Fit the elastic around your shoulders first, to make sure that the shirt won't be too big or too tight.
I pinned a safety pin to the end of the elastic to help me guide it through the fabric.
Slide the elastic through the fabric, once it's done, pin the two ends together and feel around the elastic to be sure that it is not twisted
Next, I sewed both sides of the elastic together and pulled it until was inside the fabric.
Then I simply close the button and tada your shirt is an off-shoulder top.
This how the off-shoulder style top looks if you want you can stop but am going to add a few extra details to this top.
WORKING ON THE SLEEVES
I had several options for the sleeves, but I decided on long sleeves with an elastic at the end.
I cut off this hard part of bought sleeves, then I folded over a few centimetres around the sleeve.
Next, I sewed around the sleeves making a tube for the elastic, be sure to leave a small opening so you can put the elastic inside.
Slide the elastic inside, in the same way as you did for the off-shoulder part.
Sew the ends of the elastic together.
Pull them inside the tube and close the opening.
Repeat these steps for the other sleeve.
ADDING THE BOW
You simply do this by making a loop and sliding a rectangle-shaped piece off fabric through it.
I cut a piece out of harder fabric from the sleeves for the loop.
Lay it right sides together on the fabric and sew one side to the fabric.
Turn the fabric into a loop and attach this as well.
I could not sew the loop on to the fabric from 1 side, so I did it from both sides.
Next, cut a piece of leftover fabric into a rectangle.
Fold both end pieces to the middle en sew this.
Next, fold your fabric into an accordion and slide it through the loop and tadddaa you have a bow.
Normally adding the bow would have been my last step, but I didn't like the bottom of the top. So I decided to add in another elastic, for a change.
FINISCHING THE BOTTUM PART
I did this in the same way as with all the other elastics.
Fold the edge over at a length that you desire.
Cut it off but leave a few centimetres to insert the elastic.
Introduce the fabric to your sewing machine and don't forget to leave an opening.
Slide the elastic through the loop, sew the ends together and close the opening.
Thank you so much for watching this DIY tutorial, please give this video the big tumps up and subscribe to my channel for more tutorial like this one.
If you would like to watch more DIY tutorials:
DIY dress from an old T-shirt: https://www.youtube.com/watch?v=t634QsAoxEo
DIY paper bag skirt from a men's shirt: https://youtu.be/QOj52qMby44
DIY open back blouse: https://youtu.be/IB6DYDkJnvU
DIY jacket from old jeans:
https://youtu.be/5nRLLktuNlM
How to make a jeans skirt from old jeans: https://www.youtube.com/watch?v=8QiwXrALgaI
DIY backpack tutorials
Mini backpack from old jeans: https://www.youtube.com/watch?v=S8GIifV-olI&t=24s
jeans backpack in Herschel little America style: https://www.youtube.com/watch?v=UppkZgT8sfY
Jeans backpack fjall raven kanken inspired:
https://youtu.be/oTSKMUs6z-o
Thanks for scrolling through this description. DON'T forget to like and subscribe!


Comments